Hey there all. Welcome to my humble abode for my take on the ICON Blog Hop. If you arrived from Jodi's Blog, then you are on the right track... If you just happened along or came directly here - then take a look here and then check out the rest of the blog hop starting from the beginning.
I really love the Steampunk look of things, so I decided to pull out my gears Spellbinders Dies and cut out a few of the gears in different colors of brown. The Icon image I chose I think goes so well with the gears. The little bitty ships wheel from a couple of the sets (Mermaid Anchor and Ahoy Sailor) and reinds me of the gears. The spokes and all. So I stamped that wheel in the middle of the cutouts that I made of the gears. I also added some ink with sponging to give it more of an antique-y, metal-y look.
I chose the paper from a 7Gypsies set I have. The ATC is made with a clear acrylic base. I pasted all the gears and the extra doo-hickeys to the front of the plastic sheet. Then I stamped "It's Your Lucky Day" from Mermaid Treasure set in Black Versafine. Then I clear embossed it. This I stuck using ATG tape to the back of the clear plastic. I trimmed the paper around the plastic shape. Then I added a bit of extra to it with bendable wire. this I wrapped and twisted in different areas. Where it is coming up through the image... that is through a hole I punched with a metal punch.
I hope you enjoyed this. Just another way to use the Icons in the Bombshell Stamp Sets.
Now - you should head on over to Kim's blog and see what Icon-ic thing she has in store for you. If you get lost along the way, you can always come back here and use the list below to find your way.
Bombshell Blog: http://bombshellstamps.blogspot.com/
Alison:
http://alisonsrandomthoughts.blogspot.com
Laura: http://craftylittlewoman.blogspot.com/
Torrey:
http://left-field-studio.blogspot.com/
Sparkly
Engineer Mary: http://sparkly-train.blogspot.com/
Stempelientje:
http://stempelientje.blogspot.com
Glittery
Katie: http://ferrishyn-frontier.blogspot.com
Kelli:
http://www.cajunstampingqueen.blogspot.com
Jodi:
http://www.elamdesign33.blogspot.com/
Alaine:
http://missalaineousmosaics.blogspot.com/ <-- X marks the spot
Kim:
www.craftypinkanchor.blogspot.com
Kathi:
http://kathstales.blogspot.com
See you again soon. :-)
Wednesday, July 25, 2012
Tuesday, July 24, 2012
Girly Girl
Hey there all. I got some "new to me" stamps in a couple of days ago, and here is some girly girl fun with one of them. This is "Samantha" from Kraftin Kimmie, and their challenge this week was to use Stitching. I chose Faux, because Well... that was easier, and I am tired. LOL.
I colored Sam up with E000, 00, 11 for her skin, and the Pinks are a multitude. There is RV11, 13, 14, 29, 02 and 04. The greens are YG11, 13, 17 and her hair is Y11, 21, 23, 26 and 28. Her eyes are B12, 14, and her compact is C1,3,5,7.
I added some sparkly to her eyeshadow, and buttons, shoes and compact. I then paper pierced and then faux stitched and used a pink colored pencil for the stitching. I went over that with the sparkly one. I did a similar thing with the pink squares with white pen and sparkly faux stitching. The flowers also have some sparkle added to them.
I added the white and pink sheer bow (double ribboned).
This is being entered into the Kraftin Kimmie challenge and also the CMC Challenge for Girly cards.
Friday, July 20, 2012
I'm a little Dotty - and ready for an Adventure
Hey guys - I should say I had an adventure. LOL... And not necessarily the good kind. I spent about 14 hours traveling out to the San Francisco area on Tuesday, to go to a meeting Wednesday and then turn around and spend another 14 hours traveling back. Gotta Love O'Hare. But, that made getting home and opening my packages from Kraftin Kimmie all the better. See I won a Facebook contest and then I placed a big order when they had their sale, and they both arrived while I was gone. But YAY - got home at 12:30 last night and went right in and opened them. YAY. So I had to set them aside until after work today, but hey... I still got to them.
The first project I have for you is using one of the new sets I ordered. One of my Copic Heroes Cheryl developed the challenge for this week, and it was to use Dots. Lots of Dots. This lovely girl with her head in the clouds or in a book, or in both, fit perfectly. She came ready made with dots. :-)
Now, although this pained me TERRIBLY - - I have leftover orange ribbon (shudder) from my daughters dance team that has big old dots on it. I made the girls outfit match the ribbon. She is painted in YR02, 07, 09. Her skin is YR000, 00 and E11. The blue is B12, 14, 16 and her hair is Y11, 21, 26, 28. I added a touch of cool grey on her socks and on her book.
Did I mention that Cheryl is one of my copic heroes. Well... I will say it again. And I have learned a lot watching her. So... I decided to use her dots technique on this. I used B0000, 000, 00 and B60 on this... and surrounded her and her thoughts. :-) I made this into a little tag.
The second project I have to show you is the card I made a few days ago for the Kraftin Kimmie Guest Design Team call. SIGH.... There are so many talented gals going for it, but I wanted to throw my hat into the fray and take the challenge and attempt to have my own adventure. I did that with Lavinia. She is such the happy gal and looks at all new challenges not as a challenge but as an adventure. (Ok... that is my imagination, imagining that she does.) Because of that I thought that the sentiment from Cleo set worked so well.
I used this gorgeous Graphic 45 paper with balloons, and tried valiantly to match her dress to the green... but I also wanted to make it a tad brighter, as she needed to be the part of the adventure that shines. She is a mixture of YG41, 45, G40,43,46 and a little BG thrown in. Her hair is Warm Greys... several of them. And, the purples are the V2x series, to add some interest to her dress (plus I love green and purple together). I added bows and bling, and even bling to the bows, and finished her up with a little antique flower and a couple of keys for her adventure.
OK... thanks for showing up today. I am tired (see my adventure above) and need to go to sleep. See you again soon.
The first project I have for you is using one of the new sets I ordered. One of my Copic Heroes Cheryl developed the challenge for this week, and it was to use Dots. Lots of Dots. This lovely girl with her head in the clouds or in a book, or in both, fit perfectly. She came ready made with dots. :-)
Did I mention that Cheryl is one of my copic heroes. Well... I will say it again. And I have learned a lot watching her. So... I decided to use her dots technique on this. I used B0000, 000, 00 and B60 on this... and surrounded her and her thoughts. :-) I made this into a little tag.
The second project I have to show you is the card I made a few days ago for the Kraftin Kimmie Guest Design Team call. SIGH.... There are so many talented gals going for it, but I wanted to throw my hat into the fray and take the challenge and attempt to have my own adventure. I did that with Lavinia. She is such the happy gal and looks at all new challenges not as a challenge but as an adventure. (Ok... that is my imagination, imagining that she does.) Because of that I thought that the sentiment from Cleo set worked so well.
I used this gorgeous Graphic 45 paper with balloons, and tried valiantly to match her dress to the green... but I also wanted to make it a tad brighter, as she needed to be the part of the adventure that shines. She is a mixture of YG41, 45, G40,43,46 and a little BG thrown in. Her hair is Warm Greys... several of them. And, the purples are the V2x series, to add some interest to her dress (plus I love green and purple together). I added bows and bling, and even bling to the bows, and finished her up with a little antique flower and a couple of keys for her adventure.
OK... thanks for showing up today. I am tired (see my adventure above) and need to go to sleep. See you again soon.
Wednesday, July 18, 2012
Bombshell Blingy Bling
So Ms. July threw down the challenge to make some homemade bling - specifically to make a piece of jewelry using your Bombshell stamps and die cut papers. You may also use ribbon, gems, sparkles and findings but NO altered pre-made jewelry items.
Well the Bottlecaps work perfectly for this. :-)
I used the beautiful flower stamp from Butterfly Queen, I colored it up with RV52, 55, 66 and a little bit of black to match the Bottlecap design (You can't see it here - but it is black and pink Zebra print). I cut out the flowers, and then glued it to an epoxy gem. Then I added the black polka dot behind it and trimmed it to fit. I then added a bit of E6000 to the back of it and placed it in the Bottlecap.
When they were done, I used a metal punch to punch holes in the top of the bottlecap. For the earrings, I added one jump ring and then the earring finding. For the necklace I added two jump rings to the punched hole. These are for my daughter for next year. She loves dangly earrings and Pink and black.
Now, I really think you should go check out what the rest of the Bombshells have done for the challenge. AND while you are there - JOIN IN! Come on... you have a chance to win free rubber. :-)\
Ok... Heading out for the day. See you later!
Thursday, July 12, 2012
Everything's Shiny Cap'n
Not to Fret.
The CMC Challenge for dark blues this week was married with this Kenny K image. I colored her up with Blue 32, 34, 37, 39. The browns were E30, 31, 33, 35, One of the things I really enjoyed coloring was her sheer skirt. I used B60 and B32 to lightly feather up to give it a blue tinge.
Whenever I see the Steampunky outfits I think of the best space series ever - Firefly. So I borrowed one of Kaylee's lines and included the "Everything's Shiny Cap'n. Not to Fret." as the sentiment.
I hope you all are having a great week and also hope you have a great weekend. I plan on it!
Wednesday, July 11, 2012
Linear Sketch
I really REALLY loved the sketch this month over at Bombshell. The straight lines are so classy.
The rules:
• Feel free to flip it, flop it, and make it your own.
• Use Bombshell Stamps!
• Upload your take on the sketch here by July 31st for a chance to win a fabulous prize.
• Check out the Bombshell Blog on the second Wednesday of the month. Upload your take on the sketch there and double your chances to win!!!
• Have fun!!!
For my lovely lady I used Linen Closet DCWV matstack, and incorporated the lines from one of the papers as the lines across the bottom and top. The image is from Mermaid Anchor. I actually chose the paper first, and didn't flip the sketch - it's a mid-summer miracle.
She was colored up with the closest matches I could find to the paper. I used E0000, 000, 00 for her skin because she is at the bottom of the sea, so she would be pale now wouldn't she. Her tail is BG90, 93, 96 and BG70, 72, 75. The anchor is B91, 93, 95 and R81, 83, 85. The seashells are E81, 84, 87 and her hair is E30, 31, 35. Now... some of it was a little bland, so I went over areas of the tail and her hair with YG11 when it was done. It brightened it up quite a bit.
I hope that you head on over to the Bombshell stamps blog and check out what all the Bombshells and pin-ups have for you. Then I really hope that you participate in the sketch challenge for a chance to win some free Bombshell stamps.
Talk to you again soon!
Saturday, July 7, 2012
Flourishes Monthly Challenge
That time again - Time to work on Flourishes release week challenge to try to win their July release. So a sketch card should be easy right? Simple. Follow the sketch. Only no, I had to go and make it complex. Needed a card for my cousins (well my cousins daughter - is that my second cousin or first cousin once removed???) bridal shower next weekend. It is a recipe shower. Hmmmm lets use this card to do this.
So, lets find the image - that was the easy part. Italian Garden. Ok... next I chose my paper. Used the Basic Grey Origins paper pad. Now... what to do. Hey, we are supposed to take recipes to her shower, so I decided to make this a pocket card and let the inserts be recipes. ... Hmmmm... now I have to find recipes that I can easily type up and can fit on the back of these. ... ok... that took a little time. Coloring - more time - picking the exact papers more time. SIGH... I have worked on this all day.
But in the end - I like how it turned out. The time was a lot, but the result was worth it.
Once I had everything printed out and colored, I glued it all together. Then I laminated the two inserts - to allow it to be used in the kitchen.
The image was colored with BG0000, 000, 01 for the glass, R12, 14, 17, 29 for the tomatoes, YG61, 63, 67 for the bottle, and G21, 24, 28 with YG23 over-colored over it for the basil. The Garlic is E50, 52, B60, and the Cheese is YR30, 31. The table is E30, 31, 33 and the Sky is B32 (airbrushed around the edge after it was cut out. I also airbrushed the other insert after the sentiment was stamped with B32, E30 and YG61 in the center.
OK.. Now I am hungry. Grrrrrr.
Have a great rest of the weekend.
Monday, July 2, 2012
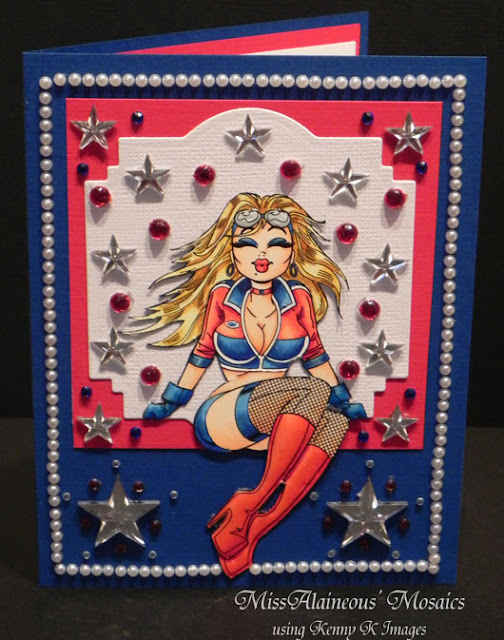
Red, White and Texas Big Hair!
Howdy! Such good things happening - I mean it is a short work week - Tomorrow is my Friday!!!! Texas A&M is officially part of the SEC!!!! My eldest daughter felt guilty about doing something so cleaned up a bunch of the house!!!! I just won on a Facebook challenge for Kraftin Kimmie stamps!!!!!! WHOOOOP!!!
And... I have a card to share. Happy Happy Joy Joy!
I made this card for a few challenges:
CMC Copic Challenge 46 - Big Hair - Yeah - lotsa that!!!!
Kenny K's Krafty Krew Challenge 100 - Patriotic - using the colors of the flag - red white and blue covers all of my flags (except my Aggie one) - Texas, Tennessee, US
and
MarkerPOP's Blog - Challenge 1 - Coloring Hair / Fur - Again her locks are blowing in the wind :-)
I colored her skin with YR000, YR00 and E11. Her blush is a bit of R20. The blues I started with B12, and progressed up to 14, 16, 18. The shadows are the B18 while the lighter is just progressively getting darker through the other colors. The reds are R12, 14, 17, 29 and a spot of 39 in the darkest shadows. Her hair was a lot of fun to color. I started with Y11 to give it a bright blonde look. I then started wity Y21, 23, 26, 28. Even that in a couple of areas was not dark enough. So in those I used E35 to add the final shadows.
When I was done I used some dimensional effects from Mod Podge to turn her boots and gloves into vinyl. And her goggles into glass. You can't see it here, but you can on the card itself. I cut out a Nestie with white, and then layered on the red and then finally the blue. It looked nice and plain, so I got out a TON of blingy bling bling. I had all these stars, and then added the red crystals. The white pearls tied it all together.
Whew.... Now I have to do do some more work.
Talk to you later! Have a great crafty week!
Subscribe to:
Posts (Atom)