Saturday, December 20, 2014

Hummingbird Christmas

Hi all. I have been traveling for work, and so not being all crafty, but I finally got home a couple of days ago. The whole time I was traveling I kept coming back to making a purple and turquoise hummingbird carrying a Christmas greeting. So when I got home, THIS is what I ended up with:


This image is Steampunk Hummingbird . The silvers on the body of the bird are Cool greys. I added a touch of turquoise to the wings and some of the V12 to the tail feathers as well. This gave a little more dimension to the grey. The purples are V12, 15, 17, and the turquoises are BG000, 12, 45, 49 and 78.  When I was done, I colored around the entire image with B39... this is the blue. I knew I wanted to cut this image out, but the dainty stems of the feathers on the wings was going to make it really tough. 

The background was a LOT of fun.  First I took a piece of white paper and laid down a stencil.  I used a stencil brush and added some art anthology mixed media product.  The one I have is a silver. Once dried, I used silks acrylic glaze over it. The one I used was Caribbean Mist.  I took a paintbrush and painted over the entire area. Then I took a damp paper towel and wiped the glaze off. This removed all the shiny turquoise from everywhere except where the original stencil had left areas open. It is all shiny and glittery and beautifully textured. 

Last I popped up the hummingbird, and added this little charm I found at one of the big box craft stores with some fiber I have had in my stash for about forever. The final step before mounting with the navy and white cardstock was to add some glossy lacquer over the entire image to make it shine. 

And VOILA - crafty hummingbird with Christmas greetings. 

I hope everyone has a HAPPY Christmas and a WONDERFUL NEW YEAR! 

See you around the web!

Thursday, December 4, 2014

SCACD Holiday Inspiration Day

Hi all and welcome to the SCACD Holiday Showcase. The Design Team along with some very special friends have gotten together to provide you with some Holiday Inspiration!  There are a lot of us sharing, so be sure to check out all the wonderful projects by checking out the Follow Your Heart Blog.

I ADORE this Masquerade digital stamp, and Love to color her for Christmas.


One of the things I love about this image is that you can make the fabric be all sorts of beautiful with all sorts of interest. Also, it can be used almost any time. This card is a bit larger than your typical card - as it is more like a 5 x 7 card. Sometimes that causes problems if the paper you want to use is 6.x. 6. In this case I used a 6 x 6 design paper, and cut it in half. Then I used the gold bling over the separation. Boom.... extended pretty paper. :-)

For this particular card I also raised up the main image with foam tape. This gives it a lot of dimensions. I then punched out some holly leaves in two shades of green. Instead of using red bling for berries, I went with the same gold bling I used elsewhere and then layered the leaves and berries up and then added some details with gold pen to the leaves. 


Copic Colors:
Skin - E04, 11, 21, 00, 00, R20
Hair - E18, 15, YR23
Purple - BV08, V17, 25, 22
Greens - G99, YG67, 63, 61
Gold was using a gold pen.

I hope you have enjoyed my take on an SCACD image for Christmas, and are inspired. Head on over to the blog and check out what all the others have put together for you there. 


I am entering this into the Kit and Clowder Christmas Challenge

Monday, November 24, 2014

Key to my heart!

Hi guys. I hope you all are having a great crafty week so far. I would like to share a card I made for a friend of mine for her birthday.

This is using a stamp from the Elizabeth Bell for SCACD collections. She is known as Key to My Heart, and is part of the Fairy Dust Collection. I love this little fairy - everything from the Key to the hat, to the way the dress is laying.  I colored her in shades of rust and green and brown, because well... I just thought it fit. :-)

I did fussy cut this out.  The black frame was one I had from cutting out a different piece. It left the frame, so I placed it on top of the polka dot paper. This is a great way to use your scraps that you have, you just have to be careful when you cut the original item. 

Then came the findings. The gears etc... I used several different pieces. There are a ton you can find at the store here, and here are here are three that come to mind. All of the paper I used were scraps from previous projects, so I do not know the brand. 

I hope you check out all the fun new stamps that are in the store, and have a happy crafty week!!! See you soon!

Alaine

Saturday, November 15, 2014

WOW - it has been a LONG time

Hey there All!!! I haven't been coloring for a while. Travel, and work, and other crafty pursuits have grabbed my attention. But I had a chance to color this gorgeous Steampunk Flower AND incorporate some of the other crafty things into the project. WHOOP.

The goal for this was to match colors with the tatting of the butterfly. See Maroon is my practice color (technically it is burgundy - but as a Texas Aggie, I choose to think of it as maroon). The yellows and greens were color combinations I have used a lot (G99,94, 82 for green, Y11, 21, 23, 26 for the yellow/gold). But the copper and reds were not my typical combinations. But I think they turned out fantabulous.

The copper color was E18, E15 and E02 which softened it up perfectly. The reds were R22, 29, 46 and 59. I NEVER would have thought R46 was darker than R29, but GASP - it was! I added a little black in the shading areas too.

This was a perfect image to get crazy with some sparklies too. That is one of the things I like about the Steampunk images that Susana has... There are lots of screws and rivets that allow you go metal or sparkle. So I took some really tiny gems and stuck them in different places on here.  After I finished the image, I slightly used the out of the box technique to get the bottom leaf and stem in the die. Then I put the card together and placed the needle tatted butterfly and edging on the card. My old obsession with my new one. EEEEEek!!!!!

I have been trying to find something that I can travel and do. I have looked at crochet, which I am still attempting, then looked at shuttle tatting and got really confused, and I think I bought the wrong shuttle. But then I saw a video and figured out that Needle Tatting is fun and fast and I have been playing a lot with that the last few days. Both of these are patterns out of a book that is for practice. I am hoping to get to the point that I can convert the fancy shuttle tatting designs into some needle tatting designs and go crazy.

I hope that you check out the gorgeousness that are the Eclectic Steampunk Images over at SCACD. :-)

Talk to you later, and enjoy the rest of your weekend!!!!

Alaine

Sunday, October 26, 2014

Cupcake and some psychodelic art journaling.

HI there guys. I am still on my journey to make Holiday cards.  I chose to make one with Poinsettia Cupcake Digital...

Mmmmm I want cupcakes now.  I actually made this a pretty large image printout. Mainly because I wanted it to be a real focal point. Once it was colored I cut it out and placed it on the green paper. For  most of my cards I do not put a sentiment on it until later. That way I can change the sentiment for any reason.   Even for Holiday cards. That way you can personalize them a bit for the individual that is getting the card. Also, because I didn't know what to say. LOL.

Speaking of not knowing what to say...I actually tried an art journal entry.


So playing with my copic airbrush, and being exhausted. Yeah - - this is how it turned out. LOL. Although a pretty accurate picture of my brain at any given time.

Have a great week and see you all again soon.

Alaine

Wednesday, October 22, 2014

Purple Poinsettia

So I really adore this new Poinsettia digi image. It is so beautiful.


I initially intended for it to be white, but it came across as more purple. But I love the wintry look of the cool blues.  The leaves were done with flicks in and out from both the center and the edges of the leaves. YG61, 63, 67 makes up the majority of the leaves, but G99 is also used for the deeper shadows.   B60, 63, 66, 69 are poinsettias themselves.  I used a gold pen to add the centers, and then to dot around the image to make it a bit more festive.

It needed a simple sentiment, and I used the Happy Holidays sentiment from the digital image of its namesake "Happy Holidays". :-)

My art journaling experiment... UH.... Not sure. I got a little nutso with the copic and the airbrush system. It might be a good background page for something about my nutso brain... or ADD or regurgitation of color. Hmmmmmm

See you all again soon,

Alaine

Saturday, October 18, 2014

Faith that I will eventually understand Art Journaling!

Hi Guys - I have been doing a LOT of coloring lately. Just coloring, practicing, having fun.
One of the recent images I have colored was Faith.

I love trying to merge colors. The BlueViolet and the Blue merging together on the wings makes me happy Happy! :-).

I haven't done anything with her yet - other than put her in a journal. I do not know what I will be doing on that journal page, Because this whole "art journaling" is confusing to me. As of now I have two pages. One with a Phoenix on a scrapbook page  with red sparklies on either side... with NOTHING on it. The second is the white page with just Faith on it. Nothing else.

I think the concept of "journal" is what has escaped me. Writing down thoughts, etc.... My thoughts are more like work - oooo song - -  work - -  Hi Honey - have we won the lottery? No dangit! - - work - doodle (drawing) - Doodle (my puppy) - Mal (my other puppy), ooooo whats for dinner.... Oh my daughter looks so pretty and is doing good in school - - oh my other pretty daughter is employed YAY!  Nothing profound enough that in my mind it should be placed on paper. HA.  Until then I will forge ahead with putting whatever random images I feel like doing in my journal. We will see whatever happens. Maybe one day I will have something around it. :-)

Have a great weekend.

Saturday, October 11, 2014

Far East on a Box!

Hi all, This is the second side of my mixed media box post. You can see my first one here. My second part is a bit different than I intended.... I initially was going to do each one of the elements on each side of the box, but I had a slight change when I picked my next image to color. The Far East called to me, and I had to use her on the box.

I colored her with my copics, and then cut out the gorgeous image. This is such a very pretty image and a lot of fun to color, because there are so many different elements in it. It is also a great image to practice coloring hair on. It has some waves, and straight sections and curls.

After I cur her out I stuck her to the red cardstock, and then placed that on the black and white polka dot paper. This was all mod-podged to the box. I added white pearls around the red cardstock image and the edge of the box as well. And then added these adorable charms that mimic the flowers in her hair.


This was colored After I finished the Skin and Hair class over at Kit and Clowder. I used a color combination she used during one of the lessons, and love how it turned out. The Warm Greys with the B24 for her hair was awesome.

Not sure when I will do the "next side", but I will be sure to share it here when I do. I hope you are having a great weekend, and have an awesome week!!!!


Alaine

Wednesday, October 8, 2014

Here it comes!!!!!

Yep - It is THAT time again  - to start up my Holiday cards. I have used the Mirabelle Pursuit of Happiness Stamps to create two different cards.


The first card I wanted an alternative color feel to it, so went with the pink and blue. I used the RV52, 55, 66 for the pink, and the B2x series for the blues.  Once I was done, I added on some little pink crystals and the white ribbon flowers. 

For the second card I went with traditional holiday colors Green and red - G1x series, and R1x series with a little of the R29 and G28 thrown in. 


I love taking everyday stamps and making them meet special occasion criteria. Almost all stamps can be used in unusual ways to make the meet the situation.  I think these were perfect for winter with the wonderful hats and opportunity for sparklies.  The snowflakes on this one are little buttons that I clipped the backs off of. 

Now I need a little bit more of the Christmas spirit to get my cardmaking groove on!

Have a great rest of the week and COME ON weekend!!!!!

Wednesday, October 1, 2014

SCACD Digi-Day

Today the sweet Friends of SCACD  group and the SCACD Design Team are showcasing Fall images - even some with a twist. If you want to see all the peeps presenting their inspirations today not to mention a shot at some yummy blog candy and Susana's offering a sweet FREE digi image thru October 5, then head to the SCACD Store Blog for details.

So, this lovely lady is not necessarily a "fall" piece, but it is my take on twisting the image - Gathering Love. 


I love taking "normal" images, and coloring them and then associating them with a saying that would not normally be seen with it.  For Gathering Love I imagined the flowers as creeping black roses  - bleeding hearts. I wanted to try a dip dye technique on the hair going from the red to the black. 

After coloring her and adding the bleeding drops from the flowers, and her blood tears, I went looking for inspirational quotes. When I think of classy ladies with inspirational quotes I think of Morticia Addams. :-) This is a quote from one of the movies. 


I am not making a card out of this, but I use a lot of colored images in different ways to keep stuff with me at work. So I am going to be putting this on a work notebook. :-)

I hope you all have a wonderful day. And be inspired by different things and put a twist on an image of your own!

Alaine

Friday, September 26, 2014

Glitter me polka dots

Hi there guys. Here is my take on this months Ms. September Bombshell Challenge which is polka dots and Glitter - SO MUCH GLITTER. (Yes I LOVE that Target commercial. LOVE).


My take on this was made with the beautiful Peek a Boo Geisha.  I put her on polka dot paper  after coloring her and cutting her out. I then added with gold stickles the additional polka dots on the umbrella. This adds the glitter to the polka dots. :-)

I added some lovely embellishments after putting the card together to match the golden colors. Little tea cup with my take on a tea leaf (lol) and flying bird.

I hope you have a great weekend and Gig Em Aggies and GO Duke!!!! Whoop!!!!!!

Alaine

Wednesday, September 24, 2014

Cyber Chic Chick

Hey all.... I have been really working on different hair and skin combos lately - taking the skin and hair class over at Kit and Clowder, and trying to improve my coloring capabilities. Cyber Chic is a perfect image for those that want to play with different colors of hair and skin.


Her skin is YG67, 63, 61, G40 and her hair is BV08, 13, 02, 00. I used cool greys for the silver, and Y11, 26 for the gold of her eyes and the tubes. Once done I used Gold metallic pens to go over some of the hoops and metal, and make the dots. The background is B12. I matted it on simple black cardstock, and then I have it on a small box that I am going to decorate on all four sides. The box is cardboard color, but I used metallic lustre on the edges to give it a silver look.  I may try to do this same thing with Metallic gelatos. I think that would be awesome fun.

I encourage you to grab an image and play with some wonderful skin colors and hair that are out of the norm, and see if you can end up with something unique and wonderful to add to your collection!!!

Have a  great week, and I hope to see you again soon.

Alaine

Thursday, September 18, 2014

WIP

I have wanted to do some mixed media for a while... and I am not sure this quite fits the bill, but it is one of my first attempts. I Mod Podged this box and then put the water element image on it. again with the mod podge. and then added the little beads across the bottom of the box and in a few spots - again using the mod podge as the application medium... We will see how well it stands up over time. 

The skin is E000,00,21, 11, 04. The water is B12, 14, 16, 18, 29.  I plan on doing all four sides of the box with each of the elements. And some sort of mixed media. This is just the first of my "Works in Progress".  I will share the new ones with you as I do them, and then hopefully a final "completed" project, with corner edges and everything when I do the last one. 

I hope you all are having a great week,  Be crafty and happy!

Alaine

Thursday, September 11, 2014

A few little pictures for you....

Hey there guys.... I have been busy coloring. Not so much making cards. I want to put these in an art journal eventually...  but until then I have some images I have colored I want to share. 


I present to you Mr. and Mrs. Bones...


They are all dressed up for a nice little party out on the graveyard. 


Not sure when I am going to make something with these, but wanted to upload and share until I do. 

I hope you have a great rest of the week and get all kinds of crafty.  :-)

Alaine


Wednesday, September 10, 2014

Red, White and Black. YAY

It is sketch time over at Bombshell stamps. Today I Have gone red, white and black. Harley Quinn colors. I want my nails done like Harley Quinn now. SIGH.


I love this. I had a lot of fun with the skin and with the dressing up. This was a lot of fun, and I really like the layout of the sketch that Kathi made for us!!! GORGEOUS-ness. I have to say this was WAY more design paper than I usually use!  But it was FUN! 

I hope you join us this month and show us your take on the sketch!

Alaine

Monday, September 1, 2014

Now I want Cupcakes. SIGH

Hi guys. It has been a long crazy weekend around my house. In the US we have been celebrating labor day. We celebrated by taking my daughter to the hospital for her I don't know how many-ith kidney stone in the past year. She is just 15. SIGH.  So all day Sunday was at the Children's Hospital. and Sunday night was pain meds and nausea meds. She woke up this morning feeling much better... so hopefully the stone has moved on out of there.   We did have delightful smoked pork ribs on Saturday... and for today I made homemade vanilla no-cook ice cream. MMmmmm. Can't wait to try it.

I did get to get a bit of coloring in as well, and decided to try my hand at the new digital fairy from the new Digi release by Carmen Medlin for SCACD. This one is called Cupcake Fairy.


First things first - she is full size. When I opened the image in MS Word, I left her the size she was. It made it a little easier to color the details, yet a little harder to get the blends in because such a large area. I chose to do her in teals and greens because - well Love the color combination. The pick of purple came last - ok... second to last. The pink background was last.  The only "embellishment" other than coloring is silver dots on her wings and buttons of her waist sash and her top. I have framed her so that I can take her to work and have her on my desk. :-) 

I love to fussy cut. Mainly because I ALWAYS accidentally go outside the image when I am coloring. SIGH. This one I was going to try to leave on the white paper.  . . Alas, that was not good. I had a LOT of accidental oopseys. But many of you may wonder how to do the fussy cutting when there are things like curleycues on the end of the wings, and a wick for the candle and her spiked shoe. Those are HORRIFIC to cut out and have resemble anything good. Well at least for me.... I am not a professional paper cutter and have trouble with those types of things. 

The solution - I printed the image out again on a piece of pink cardstock that I had cut down to 8.5 x 11.  When I fussy cut the image, I cut off the curlies on the wings. and on wick, etc... Then I CAREFULLY placed the cut out image on top of the one printed on the pink cardstock. 

I then added some silver dots at the tips of the wings and at the center of the curlies... although you can't see them as well on this picture. Also, on the chain around her belt... the pearl / gem  on the right side that is on its own is also on the pink cardstock, with silver in the middle that I added after I placed the main image down. 

Colors Used: 
BG000, 01, 05, 07, 09
YG01, 05, 07, 09, G19
V000, 01, 05, 06, 09
E000,00, 11, 21, 04, R20

Have an awesome week!!!! 

Alaine

Wednesday, August 27, 2014

Hip Hop Hooray

Howdy All!!

It is the last Wednesday in August -  OMG IT IS THE LAST WEDNESDAY IN AUGUST!!!!! Where the hell did the month go? Since it is today, that means it is Hump Day Hop for Bombshell Stamps.  Our hostess with the Mostest has challenged us to be shiny in this hop and GO GILDED - i.e. use Metallics! 

I decided to make an ATC, and a new product I have (gelatos). 


I used some of the Bombshell Butterflies and colored them in silver and gold (silver and gold, Everyone wishes for Silver and Gold - OMG - NO... It is NOT Christmas yet!!!!),

I took a black ATC base that I had and used the gelatos and SMUSHED them around. I used two colors - a gold and a silvery bronzy thing. I spritzed VERY lightly and mixed the colors and left it so the black comes through. I then stuck the butterflies and metallic elements and VOILA... A metallic background with metalic-ish colored butterflies and metalic elements. WHOOP.

OK... Last but not least - FOOTBALL STARTS

GIG 'EM AGGIES !!!!! WHOOOP!!!!! - BTHO South Carolina

GO DUKE and #47!!!!!!

Here is the BLOG HOP list! :-)


See you soon!!!! Alaine

Monday, August 25, 2014

I HOPE this week goes really quickly!

Today I am sharing another take on Hope!


This time I wanted her to have DARK wings. Lovely blue wings. I used B24, 26, 29m then the new copic white with built in brush to add some details. I also wanted to have some fun with the hair, so I went HOT PINK with RV21, 23, 25, 29. The greens are YG21, 23, 25 and 17.

Once she was colored, I stamped the image on the green paper, and then cut her out and stuck her to it. That allows for all the gorgeous swirlies to be there on the colored paper but also to allow the image to be colored on the white. I am loving this technique and use it a lot now.

Just so you all know the Zen Beauties collection is available in Red Rubber, and HOPE here is available in both rubber and digi format.

For those of you who love all things Digi - Susana has released several new digi stamps in the store. There is an adorable little hungry seal, a ghost and pumpkin, another fairy with a cupcake :-) and a flowerful owl, along with several other images. You can see the entire collection here.

I hope you all have a good week. All I know is I am looking forward to this coming weekend a bit too much. COME ON LONG WEEKEND!!!!!!! With any luck I will actually have a 5 day weekend and only a 3 day work week this week! WHOOP WHOOP.

Saturday, August 16, 2014

Lets have a party!

Hello and happy weekend. Today I am sharing with you my latest creation using one of the new rubber stamps that have been released by SCACD. This stamp is Party Lights Border.

I made what I would consider a small party invitation. This was a fun image to color, but it was difficult for me to figure out how to get it to look the way I wanted it to. But once I did, I LOVE the way it turned out.

First I stamped the image twice. Once for the background and once to fussy cut. I used my copic airbrush to color the background image with dark blue and light yellow for the glow. On the second image I colored all the light bulbs. I then did the hardest part of cutting out all of the light bulbs. I ran them through my little Xyron X thingie, and then stuck them on top of the background image.

Once that was done, I added clear sparkles to the bulbs themselves and then gold dots on the rest of the chains hanging.  I cut the image out and glued it down on gold sparkly paper. Then I gut out the wings out of the same sparkly paper using the Steampunk Wings Pair Die. I also ran this through my xyron to get the wings sticky, and then attached to the sides of the stamped image. For this I ran the top part behind the image and the bottom of the wing in front of the image. I then stuck the entire thing down on dark blue paper.

It looked good, then I messed it up and tried to write with my stickles. EPIC FAIL. So I decided to cut out the entire thing and then place it on a small folded card piece to make it a smaller card. The inside can now read anything I want, and it really frames the image. I love it more than the original idea!


Wednesday, August 13, 2014

Sketch Wednesday -Bombshell Time

Hi guys - it is time for a Bombshell Challenge - this time I am on time. I am here today to present you with the Bombshell August Sketch Challenge.

I used Growing Hearts image and sentiment for this piece. Just so you know - this is a REALLY BIG Tag - like abnormally large. I colored the image and then to make it fit, the tag had to be obscene. Just saying. 

I colored with purple the head dress. V15, 17, 09. The reds are R12, 14, 17, 29 and the greens are G12, 14, 16. The yellows Y11, 15, 19. The final section is the white skin. If you don't color anything then it looks just unfinished, so I used BV0000, 000 to finish the skin and give it dimension and actual lifelike quality - even if it is portraying death. :-)

Ok - Apparently I am VERY TIRED>... lol. So I hope you enjoyed my sketch and my ramblings. I hope you join Bombshell for the sketch challenge. and our other challenges this month!!!!!

Tuesday, August 12, 2014

Lucy in the sky

Hi all. I hope you are having a wonderful week. I had an awesome weekend. Got a new car, my youngest daughter passed her permit test and will NOT be allowed to drive my new car, and I was able to be pretty crafty.  One of my projects was to color Faith from the Zen Beauties collection.   I think I should actually call her Lucy. I saw that movie to this weekend. It was BlackWidow meets the Discovery Channel.

And this pose reminds me of Lucy from the movie at times. Well when she wasn't kicking rear and blood all over the place. I mixed the brown and blue together and added a bit of green. I made her skin the lightest I could to give her a bit of an ethereal look. Once done, I added a bit of the bronze dots. It is not very easy to see here, but there are some dots coming off of her feet and it looks like she is blowing some sparkles. This gave it a bit of movement.

One trick I wanted to share with you all is the curly cues at the shoes, wings and hair. If you want to fussy cut something with trailers and curlies, cut them off. You can't get them to cut. I promise you. What I did here was to stamp the image a second time on the patterned paper. I did this with versafine as I wasn't going to color it. Once done I clear embossed it. I fussy cut out the image, and then taped it down over the second stamped image with the curlies. That way you can get all the detail of the image but not be limited to the white background or a background to color.

I hope you all have a great week and keep coming back to check out the inspiration that the design team has for you.

Alaine

Saturday, August 9, 2014

Ghouls Only

Hey all. Well, things have been crazy (What else is new), so I wasn't able to get this project done for Wednesday when Ms. August from Bombshell set her challenge of an Easel Card. But Better late than never right?

I have used Bombshell Angel and dressed her up in this lovely witches outfit from the Halloween Costume digi set

I have colored witchypoo with purple, orange and green copics. Yeah - I am whacked. LOL. The greens are YG13, 17 and 25. The Purples are V91,93,95,99 and the oranges are YR23, 27 and 16. (I had to look at those - cuz I NEVER use them. LOL). The skin is E50, 51, 53. 

Once I was done, I cut her out and edged her with the copic black marker so when I poppped her u p with black pop dots, you don't see a black edge. For the layout I used the sketch from Sketch Saturday 322 (Which I am entering this into).
 
The sentiment came with the Digi set as well. The ribbon was from my stash and the paper - one of them is from an Authentique paper pad and the striped one - Sorry - - I don't know it is from my stash of 6 x 6 paper, so I don't remember it. 

I hope you all are having a great weekend. Have a wonderful week - see you soon!

Thursday, August 7, 2014

Serenity - It's not just a dog or a ship!

Hi All... this beauty full of zen is Serenity.


She is one of the new Zen Beauties and is actually a very calming image. I colored her with my Copics. My favorite is the blue against the pink petals of the flowers. Really love the pretty flowers on this image. They are so beautiful and dainty.


She is embellished with all sorts of silver dewdrops.

Colors used include: B60, 63, 66, 69, YG61, 63, 67, YR000,00,E11, RV81, 83, 85 and E70, 71, 74.  The background is BV00 and BV01. I tried to make it a bit darker on the edges, and lighter near the lovely Serenity.

So, to talk to the post title... Our dog is named partially after the Firefly class ship Serenity with the name Snickerdoodle Serenity. She looks like a snickerdoodle as she is a Cavalier King Charles.  We also have another one (He just turned 1 a couple of days ago) and his name is Malcolms Chaos Theory after Captain Malcolm Reynolds from Firefly / Serenity and since we had a Serenity we needed a Chaos.... and the final is the Jurassic Park tie in with Ian Malcolm and his famous Chaos Theory. So now I have explained my title.


Come on weekend and crafty time!!!!

Have a great one guys!

Wednesday, July 30, 2014

Stars and Stripes are Hopping today

Howdy All! It is time for the Bombshell Blog Hop and it is Stars and Stripes time!  You should have arrived from the Kompletely Kool site of Kim! If not, then why not start at the beginning over at the Bombshell Blog?  I went for a bit of a retro feel with my stars. 

I used stars from Bucking Bronco stamps and the Happy Birthday from the Banner Sayings stamp set. 

I picked the lime green and turquoise colors along with brown to make it a bit of a 70's wallpaper feel. (BG000,01, 02, 07; YG01,03, 05, 07, E37, 39). I colored each star and then I cut them out and went around the edge with my black Copic. This allows me to raise it and you not to see the edges as white. I added some sparkly twine for the stars to dangle and popped up bot the stars and the banner. I finished it up with the stripes from my stars and stripes. I think this works for a masculine birthday card. :-)

OK. so hop away - - check out the rest of the hop starting with Angie! and have a great rest of the week. The compete list is below!


Bombshell Blog: 
http://bombshellstamps.blogspot.com
Alison: http://alisonsrandomthoughts.blogspot.com
Marnie: http://www.papertivity.blogspot.com

Sharon: http://sharonshowcase.blogspot.com
Kim: http://www.craftypinkanchor.blogspot.com
Alaine: http://missalaineousmosaics.blogspot.com
Angie: http://www.angiesstampingspace.blogspot.com
Kelli: http://www.cajunstampingqueen.blogspot.com

Monday, July 28, 2014

Blog Hop with a Difference - spreading the Creative Love


So my blog buddy (and sometimes taskmistress) Kathi has asked me to participate in this progressive blog hop. Basically, she "tagged" me last week, along with 2 other ladies. She was tagged the week before along with two other blogs, etc. etc. blah blah blah. I will be tagging three people below to post next Monday, and continue on. This helps us introduce people to other blogs and honor those of us who are inspirations. We are spreading the creative process.

Kathi is a great inspiration because she colors so many different types of images. She is the dominatrix of the Bombshell Team, and I also serve with her on the SCACD stamp team. I also love to read her blogs... I learn so much and she gives such good "instructions" on how she created her different projects!

First off - I am supposed to chat about myself and answer some questions:

1. What am I working on?

Hmmmmm.... well I am behind - LIKE REALLY behind. I have been travelling and getting my eldest daughter settled in her new apartment with her new job out of college (WHOOP WHOOP one child living as an adult), dealing with family emergencies, and also travelling a lot for work.  

I tend to do one project at a time. I just don't finish all of them LOL. I have some cross stitch projects I have been working on for well..... 24 years. SIGH. Right now I have a blog hop project coming up for Bombshell, more projects for SCACD and I have some new stamps in and a project I want to work on for this weekend for my brothers birthday (SHhhhhhh). 

2. How does my work differ from others of its genre?

This is a good question. My style is usually very balanced. I struggle with balancing with different elements, but I am REALLY good at ensuring that the cards are very symmetrical. LOL. I think I also am a bit of a Geeky person, and I like to do quirky sentiments, and dorky statements about my cards. I also love to use songs and movie quotes  (usually sci-fi) for my sentiments... just usually very silly ones. :-). So my work differs because I Am dorky. :-)


3. Why do I create what I do?

I color. Mainly because it gives me something to de-stress with. I have had my boss tell me to take some time and color at night LOL. Gee - I wonder if I was stressed out those days. I have about 200 cards in a basket - cuz I Never send them. I am also really bad sometimes about missing peoples birthdays, etc... because I forget to make a special card. I just make them. SIGH. 

I love to color, always have - Crayons when I was little - the tube huge pages when I was a kid that had like 8 markers with it. :-) I took my first Copic class and I WAS HOOKED. Eeeeeeeeeeeeeek. LOVE THEM. I associate everything with copic colors, and I Have considered trying to create my own colors when they haven't matched exactly. (I am a bit afraid of what muddy colors I would make). 

4. How does my creative process work?

HAHAHAHA.... ok. I don't think I have a process. It is usually more random dumb luck. A lot of people start with a sketch or a theme, or in many cases a specific paper. I usually start with - what Image do I want to color today. And then I choose my colors. Then I am screwed because I have to find design paper or themes or sketches that work with that image. UGH. Yeah - I use a lot of plain cardstock because do you know how freaking hard it is to match paper AFTER you have colored. LOL. 

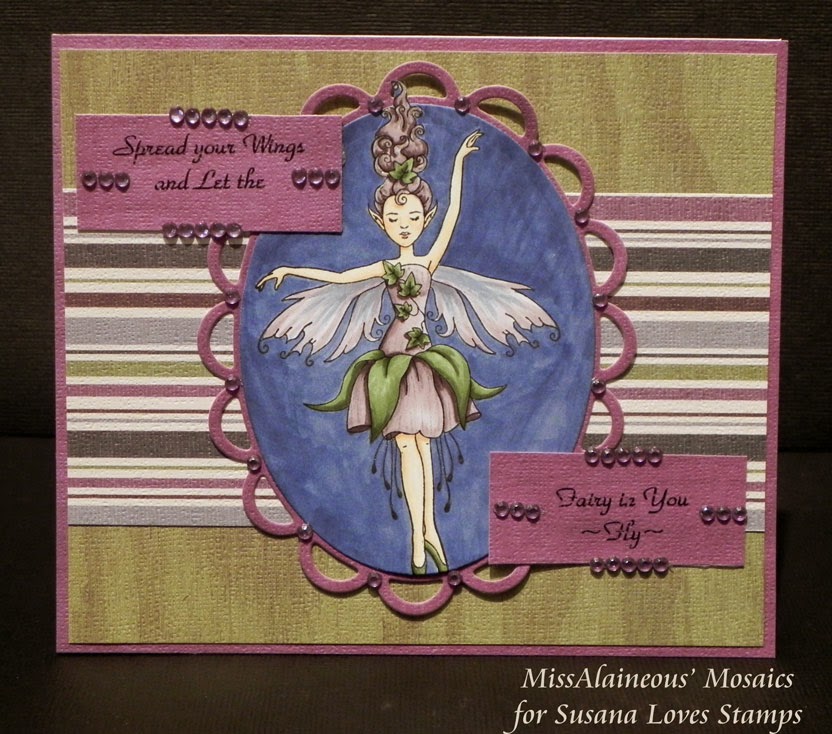
I wanted to produce a card specifically for this hop, and for that I used the SCACD new release  image Hope.  I wanted to make her FANTASTICLY vivid... so I used some really basic shades of red blue and green copics (B2x, R2x, YG2x). AS an example of my randomness... I had chosen different paper, and when I was done, the colors didn't match... so I had to go dig through my paper and find something else. WHEW.... lucky me I found these that are close. :-)


I also wanted to add some stuff and I went a bit nutso with the gold dots that I placed on her wings, her armbands, her legbands, her outfit, her hair, her face....etc. etc. etc... you can see those a bit better down below. 


I have chosen three people to "tag" who I have known and respect for their artistic abilities. I hope they will share with you next week a little more about themselves. I met all of these for a start on the Bombshell Team, but I am very happy to call them a blogland friend (and I may have even met one of them in real life). So here - in no particular order...

Cheryl - Ok... she is my copic heroine - seriously. I LOVE how Cheryl colors. I have studied her stuff for hours just wanting to color half as well as she does. And she has been on so many wonderful design teams and shared her work with everyone for so many years.  And now she is torturing me with baking on Facebook. ACK. We also discovered that we grew up about an hour from each other, which lets us bond about some of our food love too. Cheryl publishes her work on the Ink Trap and I will visit her frequently when I am struggling with my coloring on a particular image. 

Alison - I so love to visit Alison's blog (21st Century Pillow Book) because it is DIFFERENT.  She uses images that are at turns wild and crazy or cute and sweet, but always has them being used with a twist. She is always about vibrancy and fun and happy even when the images are dark and dreary. She also posts a lot about food on her Facebook (hmmmm can you see a trend forming?). Alison is one of the most creative people I have ever met. I always look at her projects and drool and wish I could be so open and free with my creativity. She is who I watch to try to expand my horizons on how I can try new things.

Katie - Glittery Katie to be exact. Katie has been delightful to get to know, and I even got to meet her when I went on a business trip to Oxford England. YIPPEE.... it was so much fun and so cool. But one of the reasons I chose Katie was not because of her card work... or her scrapbook work (which are really great). See... it is her Amigurumi (is that how you spell it)stuff that is what has inspired me to start to learn to crochet. (I am still on my first thing of yarn and just learning how to make stitches that are even.) Katie however has made some REALLY cool stuff that I hope she will share on her blog more. Glittery Katie's blog is here

This was really fun, and thank you for stopping by and reading all about me. I really hope to see you again soon. 

Here are some oldies but goodies of my favorite projects:


Thursday, July 24, 2014

SCACD THIS & THAT RUBBER STAMP BLOG HOP!!!

Welcome to another fun showcase of newly released rubber stamps and yes a few new digi from SCACD. You should have arrived from Kim's blog and if you get lost during the Hop you can always find your way at the Store Blog HERE.


SCACD is releasing 9 rubber stamps which are collectively called the “This and That Collection.” They each can be purchased now HERE. These stamps were inspired by things going on in Susana's life as well as imagery she loves. SCACD Artist Carmen Medlin and Susana collaborated on the images and Carmen did an amazing job bringing these to life!!! 

We are featuring 4 Zen Beauties as well as 5 eclectic fun stamps today.  On a happy note if you buy the complete set of 4 Zen Beauties at one time you will get an accompanying accessory maple seed stamp as a bonus stamp.

I have the opportunity to showcase Bliss


I love fairies and these Zen Beauties are SO GORGEOUS and delicate. The purple and green work so well with her. I love the hairdo and the feathery wings!!! Oh and I added a lot of sparkle that isn't showing up very well in the picture... but this was perfect for the light touches of sparkle, and some more intense touches of sparkle on the little droopy accents. (I have no idea what those are called... LOL)

I have to say I am so ready to color the other Zens, but OMG the Eclectic Fun Stamps - EEEEekkkkk.... MR. and Ms. Bones and the lightbulb border. OMG I am soooo gonna have fun with those. Fits right into my plans for Friday! :-)

SCACD also decided to offer only 3 of these not only in rubber but in digi as well for her SCACD Digital fans. So you can see the 3 newest versions at the top of the Digi area HERE . 
For our International Friends you can find the new SCACD Stamps HERE at Quixotic Paperie.
Thanks for stopping by and you should now be headed off to Delphine's blog for more inspiration :D

I can't wait to share some more creations with you! Have a great weekend all!!!!!