Thursday, November 5, 2015

SCACD Digital Stamps Release!!!!

WHOOP WHOOP - SCACD is celebrating 10 (count them T-E-N) newly released exclusive digital stamps. There are some totally adorable new animal stacks - think kitten, puppies and birds!!! There are also some new Steampunk additions - and even more!!! 

So - - check out the collection as these are really cute, fun and unique. 

SCACD Artist Carmen Medlin and Susana collaborated on the images and we are happy to be showcasing them to you now :D

  • Now available for purchase in the USA HERE     
  • All Our EU International Friends can purchase them HERE   
  • If you live in a non-EU country you can purchase direct from SCACD HERE 

I have the pleasure of bringing you Steampunk Chrysalis


I wanted to color this with standard typical metallic colors AND add a touch of whimsy with the jewel tones. I found the paper in my stash and like that the gold patterned paper has the sunbursts reminding me of the gears, and the Blue patterned paper has the harlequin look like the jewel-toned Chrysalis. 


Although you cannot see it very well, the dots in the middle of each square on the jewel toned area is a sparkly Stardust Gel pen. Gives it a shimmer and a sparkle. It is one of my favorite things to use. :-)

You should have arrived from RONI's wonderful blog, and You should be going next to the awesomely talented Delphine. if you want to make sure you saw all the Designers showcasing the stamps then head back to the SCACD Store Blog HERE .
For even more fun - check out the sale that SCACD is having HERE.

Have a GREAT DAY! And thanks for stopping by!

Alaine


Saturday, August 29, 2015

A little Hi for the weekend.

Howdy Howdy. Today I have another card to share with you using an image from the Brave Hearts Collection.  


This little girl is You-nique. I tried to color her with the thought of someone who doesn't care about matching clothes. However, I did get her hat, skirt and vest to be matchy. But she added in some other colors. ;-)

I used the rubber version of You-nique, but you can also get her in the digital version here.

For the hat and vest I wanted it to appear really soft and fuzzy-ish. So it was similar to sweatshirt material. To do this after I had colored her, I used the colorless blender with my copics and dotted over the entire area. That softened up the colors a bit.

OK. So now I need to go off and do some more crafty things. :-) See you soon.

Alaine

Sunday, August 9, 2015

School is starting and Halloween comes soon

So I thought I would make a Halloween card.

This image is Be You and comes in Digital and for those of you who like the tactile feel - Rubber! In Rubber it is also part of the Brave Hearts Collection.

I love coloring different colored hair. So for this picture I thought I needed to mix up the green and purple again. 

So school starts tomorrow for my 16 year old. SIGH. Time is flying! Can't wait to see her Junior year - hopefully it will be her best  year ever. Whenever school starts - I always think of Halloween. Love costumes ... I thought this lovely needed to be on a Halloween card. :-)

Colors used - V12, 15, 17, 09, YG99, 17, 13, YR09, 18, 16, 02, Y15, 11, E04, 21, 11, 00, 000, R20. 

The dots around the edges are G5, 9, Y15, V12. 

Alaine


Wednesday, July 29, 2015

Exhaustion in the Ville

Hey there guys. MAN AM I TIRED! But I wanted to make sure I  posted some new creations just to keep my flow going! So here is my latest.
This is the final entry on my Mix it up Box. I have done the other sides here:

http://missalaineousmosaics.blogspot.com/2014/10/far-east-on-box.html
http://missalaineousmosaics.blogspot.com/2015/05/happy-happy-may.html
http://missalaineousmosaics.blogspot.com/2014/09/wip.html

For this one I used Earth from the Elements Collection. I am not really sure why I wanted her to have blue hair, but I love how it turned out. 

Now remember the part where I said I am TIRED! Well it is nighty night for me. But with any luck I will get to do some coloring sometime this weekend, and I hope to have some more posts up soon!

TTFN!

Alaine

Sunday, July 19, 2015

Jellyfish Lantern

So I am so missing the beach. Or the water... or ocean, or whatever.  I love spending time in the water. Snorkeling is one of my favorite things to do. One of my favorite things to do when we visit an acquarium is to look at the jellyfish. For some reason I adore the way they float around.  This image reminded me of the ocean and watching those jellyfish. Probably because it is called "Jellyfish Lantern" :-)


I went with the colors of BG57, 53 and 09 for the teals... with a bit of the BG70 to soften the blow. Then I used YR68, 65 and 61 for the dreaded orange (not a fan of orange, but it screamed out to be used).  When I was done, I decided it needed a bit of pop, and instead of using white for the pearls, I used black. Once done, I added the bow as a "hanger". LOL.  All the papers were from my stash, so I do not know from whence they came, but the background reminded me of bubbles. 

I hope you all are having a great weekend. See you again soon!!!

Alaine

Saturday, July 11, 2015

We be Mixing!

Howdy Howdy!!!!  How are you all doing this find mid-July.  Today I am sharing with you my latest Mixed media  project for my art journal. 


I colored Steampunk Siren's Call with my copics, and then added watercolors for the background. She was a challenge to color for me, because I didn't want typical colors, but then I added lots of different colors. I love how she turned out, especially her hair which has greens, blues and pinks in them. 


Once I was finished, I paper tore the edges out, Then I moved onto the background. This is where I am stretching my fins so to speak. The  first step was that I used Dylusions Dotted Flowers Stencil and Ranger Texture Paste and added some texture to the background. Then I Spritzed the background with three different colors of Glimmer Mist. This was dried, adn then I added the flowers on. These plain flowers were copic air-brushed with the same purples or pinks that I used for the mermaid. I added some black crystals to the center of the bigger flowers. 

I placed all of the elements together and then got out the new toy Viva Decor paints and dry brushed several different colors all over the textured areas, the edges of the image and the flowers. Voila. DONE.

I am loving how this turned out. Even if it is a non-standard OCD look. :-)

Hope you all have a great weekend. 

Copic Colors used:

RV02, 06, 09, 
V01, 05, 09
G02, 05, 09
B02, 06, 18
E000, 00, 21, 11, 04, R20
White Molotow for white dots
Silver pen for silver nails and spines

Sunday, July 5, 2015

Kit and Clowder Retreat

So, a couple of weekends ago, I had the privilege of attending a Kit and Clowder coloring retreat with Alyce in Orlando.

This was very exciting, because I really want to learn how to improve my coloring, and achieve even better results. So this was a great opportunity. We colored several images and then did some mixed media work. When I got home I was able to put the colored images together and finish the projects with the kits that were provided. 

Here are the three projects completed. 

This first one - the instructions had a distress step, but I am not overly fond of distressing something. So I skipped that step, and just used the embossing as the distressing.


This second project, I used some bronze dry brush paints on the edging of each part of the image. I also added some of the bronze to the flower edges and the lace.


This last one is my favorite - only because of the colors, and it was one of the few mixed media projects I have completed.  The background was completed using crayola watercolors. :-) The frame was painted and sprayed and stenciled on with texture paste. This was messy incarnate. I had paint on my hands for days no matter how long I washed. 

Hope you have a great day!

Toodles!

Alaine


Monday, June 29, 2015

Christmas Ornament in June.

Howdy All!!!! It's Christmas in June! (So July is the usual - but wanted to share today). 

So I made this with the new stamps from Susana Loves Stamps - Coral Sunflowers Set. When I first saw this set I immediately thought Christmas Ornament.


To do this I stamped the image on silver shiny paper with Versafine, and then embossed with black fine embossing powder. Once it was heated and set, I fussy cut out the two images and added some bling. I added a bit of foam tape between the two images to separate them, and then bent the leaves up. Finished up with a crystal hanger, and BOOM.


So I just got back from (ok a week later) a wonderful Kit and Clowder Retreat. Help with coloring, but also tried a bunch of mixed media as well. I will hopefully share my project later this week. I need to touch up a bit. (perfectionist in me).  

I hope you have a great week! And a wonderful second half of the year!

Alaine

Friday, June 19, 2015

SCACD ECLECTIC SEA RUBBER STAMP RELEASE!!!

SCACD celebrates today a newly released exclusive rubber stamp set Eclectic Sea (9 rubber stamps all together). The Eclectic Sea is a twist of sorts in how something land bound might be seen in the ocean; for example a Sunflower that is now a Coral Sea Flower and vice a versa. So check out the collection as these are really unique and elegant. SCACD Artist Carmen Medlin and Susana collaborated on the images and we are so happy to be showcasing them to you now :D


Now available for purchase in the USA HERE for the Eclectic Seas collection.

Our International Friends if interested can email Susana.


You should have arrived from Roni's blog, if you are following the hop. If not, you can start at the Susana Loves Stamps Hearts and Hugs Blog (link below)...

I am sharing Sea Chrysalis.  I have colored with my copics, and tried to bring elements of seashell colors as well as the ocean and seaweed.  The pearls were made using liquid pearls.  The paper is Authentique Treasure.  LOVE it!!!
                                  
You should be going next to Alathea if you are lost then head back to the SCACD Store Blog HERE for the hop list.
I really hope you enjoyed my project. I have another surprise project to share with you next week. Kind of a Christmas Present. :-)

Tuesday, June 9, 2015

Off With Her Head

Howdy Howdy!


How is your week going? It is crazy around here, but hey Crazy looks good on some of us! Or should I say MAD !  

Here is my Mad Steampunked out Hatter. Had a blast coloring him in all the different maroon-y and browns and blues with golds. :-) This image is just so  whimsical. I actually found the paper and tried to mimic some of the colors in the ones I chose to color with.  

To add to the whimsy and the crazy, I paired some gears and flowers together - so soft and hard, organic and metallic. I had the off with her head medallion and teapot in my stash  Added  a bit of ribbon and softened those up too.


I used a lot of different color - normal skin tones (E000, 04, 11, 21, 00), Blues are B39, 37, 34 and 93/91 (I filled a 93 marker with 91, so Um yeah.... It is a 92).  The maroon-y reds are R89, 85, 83, I did use some R39, 27, 24 on the queens dress. The golds are Y19, 15, 11, and the Greens are YG17, 13, 11 with G99 as the darker area. I used E49, 29, 27, 25 fir the browns. 

I am entering this into the Marker Pop Anything Goes challenge.

Have a crazy week!

Alaine 

Friday, June 5, 2015

Have a BRILLIANT Day!

I am having a great day off, and was able to color this week. WOO HOO.... I have been wanting to color this lovely creature for a while now, and Here she is!!!!


This is Alien Butterfly ready for a gorgeous weekend!!! I colored these with copics in shades of Yellow Green, Yellow Red and Blue Green. All are the 1X family. The Y's were added at the end and are also in the YX family.  Once I colored her, I went in with stardust glitter gel pen (absolutely one of my favorite things ever BTW), and highlighted some areas, so when seen in real life it is a bit sparkly.

This is one of my new favorite images to color. She just looks so very lively.

I am entering this into the following challenge:

Marker Pop Challenge 70 - Anything Goes

I hope you all have a very colorful crafty weekend!!!!

Alaine

Friday, May 22, 2015

Mommy's Day Card

So, as I was pondering what card to make for my mom for mothers day, I kept coming back to the sunflower owl image.

I had not colored this image yet, and no matter what other images I looked at, I just kept picking this one up. So I decided to have a go.
The yellows are Y11, 13, 18 and some YR 18 for good measure. The greens are the G21, YG67 and G99. The browns were kind of all over the map. I used some E4x, E3x and E5x on different areas.


I love the owl images, but this one with all the layers of petals around the eyes, was a lot of fun to color. I used some paper from my stash of 6x6 paper pads. 

And for extra good measure - just to show my mom what a DORK I am, I added the sentiment which I printed out from my handy dandy laptop.

Now it is time to go do a bunch more coloring, and craftying and all sorts of stuff. Have a great weekend!

Tuesday, May 5, 2015

If your nekkid - put a box on it

So I got to color a little bit this weekend, and one of the things I colored was an image by Aurora Wings called Thep Kinnaree. When I decided to color her I decided to go au naturale and all... But then if I want to post to Facebook groups I thought - Oh my I need to cover it up. So someone suggested the black box of modesty. So I have both versions below - up close and the entire projects.

First up was with the modesty box. I will give my information on colors, etc... here, and then below after appropriate warnings and GASP spoiler space... will be the ones without that teensy eensy modesty box in case it offends anyone - and people will be appropriately warned. :-)

Her skin is E04, E11, E21, E00, E000, her hair is E49, 37, 33.  For the greens I used several including the G29, 19, 14, YG 17, 13, and 11. The purples are V17, 15, 12. The wings are E43, and E40 with a touch of the V12. The final colors are the B18 and B12 as well as a touch of Y15, R17 and YR16. 

B
E
W
A
R
E

N
O

B
I
T
T
Y

B
O
X

C
O
V
E
R
I
N
G

:-)


 Oooooo SCANDALOUS.

Ok. That is my post for today.  Hope you all are having a great week. TaTa!  (hee hee)


Sunday, May 3, 2015

Happy Happy MAY!

I cannot believe it is May. And it has been several months since I have worked on my covered Box. So I decided, it is getting warm, lets go to the Southwest for the next side of my box.

This is FIRE, one of the Elements Collection over at Susana Loves Stamps. I love this one because I grew up in Tucson and El Paso, and it reminds me of both places. 


The fire was fun to color, but I think I enjoyed coloring the sun and the hawk the most. I am not sure why, as usually those are not my things, but this was a blast. The Hawk is E49, 39, 35, 33, 31. His beak is Warm greys with Y19, Y15 faded in. And his eyes are a mix of YG61, 67 and B32 from the sky. 

Once done I modpodged the image to the box. I will say Mod Podging is not my best skill. But I am enjoying my little modpodged box. One more side to go. 

Alaine

Saturday, April 25, 2015

Orchids in the Rain

This is an image from Aurora Wings called Orchids in the Rain.

I haven't been making a lot of cards lately, but I have been coloring a bit still. So I am collecting a stack of images that are gathering dust. This is one of those images - although it hasn't had much time to gather dust - because I just colored it. :-)

The hair color - well tomorrow my youngest is getting her hair "ombre'd" with Blissful Blue. ACK. So we were looking at the different possible colors. LOL... This is BG1x colors. 

The flowers are BV1x with some RV11 mixed in and the darkest color BV08.  Based on the flowers, I am entering this into the April Challenge at Kit And Clowder on Flowers. 

Alaine 

Monday, April 6, 2015

Lotus Anything Card

Hi guys!!! I'm Back!


and I actually made another card. WHOOOOOOP... It has been a long while because things have been nutso. But This little beauty was a great image to practice with and adding the dots was a fun twist.   This Large Lotus was stamped with Memento. I colored it with only three markers - the BV17, BV13 and BV11. I then used a white pen to make the little white dots, and a gold pen to outline the stamen. 

I wanted to keep this simple, and I think this is perfect for an "anything" card. It works for thank yous and birthdays and how are yous, etc... I like these as you can add a sentiment at a later date. 

I hope you all have an awesome week this week. And practice your craft - whatever your craft might be.

I am entering this into the Kit and Clowder April challenge on Flowers. :-)

I hope to see you again soon! TA!

Alaine

Friday, April 3, 2015

Be FEARLESS

So, I am off today and making a boatload of cake balls for fun. But before I get going I wanted to share my creation using the SCACD Brave Hearts collection young lady called Be Fearless.

She is resplendent in greens and pinks (and a little orange,... but I hate admitting that it worked here). for the skateboard I used the same technique as I did for hair to make the woodgrain. It worked out really well all that flicking here and there.

I really think she is so sweet... but honestly the thought of skateboarding scares the crazy out of me. And I have a LOT of crazy in me. LOL... So saying be Fearless is so right here.

So off to the kitchen to fearlessly make cake balls. :-)

Have a great weekend all!

Alaine

Saturday, March 21, 2015

I'm a Bee-liever


I colored it this time in yellow, but I think I am going to green hornet it next time. :-)

I would have colored it all sheer wings, but it takes full metal wings to hold up all that metal!!!!

The sentiment I printed out to go with the card.

The yellows are Y11, 21, 23, 26.  I used Cool greys C5, 3, 1 and a little E04 in some places for the grey. For the wings I used BV11, YG10, and BG01.  The final touches were stardust gel pen to make it a bit sparkly which you can't really see here very well. Honestly though - this is one of my favorite favorite things... that pen is awesome!!!


Tuesday, March 3, 2015

You are Unique - Just like Everybody Else


Hi there and Happy Tuesday! It is WAY WAY early for me, since I have already driven my husband to the airport, and come back and played with the puppies, and and and... Usually I am not even out of bed at this time, and I am sitting here already ready to go to work. WEIRD. And after all that - husbands flight delayed, so I could have stayed in bed! In fact, as I was typing this, my normal alarm went off. Grrrr... let's change the greeting to Happy Monday 2. 

This is one of the new lovely ladies from SCACD in the Brave Hearts Collection. She is called You-nique. I LOVE her little hat. I immediately wanted her in teals and purples. I think because I thought of Sully from Monsters Inc with her hat.  I put the card together with all the pretty leaves, and then thought Um... I have googly eyes. I will add those near the sentiments. To me it makes it Unique. LOL. 

Blues are BG09, 05, 01, BG78. The purples are the V17, 15, 12, 09. 

I should have another card to share later this week.

Alaine

Saturday, February 28, 2015

Be Yourself


This is the second card I have made with the new Brave Hearts Collection from SCACD. She is called Be Yourself, and she reminds me of both of my daughters. The eldest who won't EVER remove her freaking hats!!!! and the youngest with her propensity to put her hair up in braids of late. 

I chose the colors of purple and black because I think that they are spectacular together, and it is rare to use them any other time than Halloween. :-) Although I wear them all the time... hmmmmmmmmm.

The purples are the V09, V04, V01 and the Blacks are the cool greys. The background die cut was colored with the same copics using the airbrush and a random pattern while the image was still in the die. This gave the white edge around it. As a trick, if you do this and some of the part you wanted white is covered you can use a white marker and go over that to leave it all pretty again. :-)

I hope you all enjoy your weekend. We are heading out to winter guard competitions. WHOOP. 

See you again soon.
Alaine


Tuesday, February 24, 2015

NEW STAMPS!!!!

SCACD is celebrating the 2 recently released NEW exclusive rubber stamp sets. They are the Brave Hearts (a group of 4 empowered gals) as well as Eclectic Collection 2 (a combination of 6 steampunk and ethereal stamps). With the Eclectic 2 collection if you buy the entire set you get 4 FREE date stamp words! 

SCACD Artist Carmen Medlin and Susana collaborated on the images and we are so happy to be showcasing them to you now!

First up here is Be-You! Isn't she adorable!!!!!  I especially love her cute little shirt and Button cap!!!!! I chose the colors based on this LOVELY Authentique paper pad, and went to town. 

The second stamp I want to show off today is from the Eclectic 2 collection, and called Butterfly Chrysalis - Change.


For this one I wanted to kind of show before and after, so I added the Steampunk Wing Set Die cutout behind it and blinged it up. 


All the new stamps are available for purchase in the USA HERE .

Our International Friends can purchase SCACD rubber stamps at Quixotic Paperie HERE.

SCACD Digital images for USA and International can always be found HERE.


You should be going next to Cheryl's blog!!!! If you are lost then head back to the SCACD Store Blog HERE ( insert this link here http://heartsandhugz.blogspot.com/ ) for the hop list.

Monday, February 16, 2015

Crafty Weekend, Crafty Time

So, There has been much traveling, and much well LIFE going on. But this weekend I got to be all crafty like. In addition to making a SLEW of cards for SCACD - Which I will be sharing starting next Monday (hee hee)... I have been - coloring over the past weekend.

One of the items I colored was this lovely fairy from Saturated Canary. I have taken the Kit and Clowder classes on Skin and Hair and Clothing, so this was a big practice piece on the no-lines (ok very faint lines) technique. 

I really like how she turned out. But I think my favorite part - if you can see it on here is the pom poms on her shoe ties. They were a complete accident. I used the dotting technique with BV08, BV17, BV13, BV11. Then it was too dark... so I took the blender pen to try to dot lighten it... but alas I overfilled it, and it put a big BLOB of the colorless blender on there. Boom it made all the colors mix and mingle and spread out. :-)  I adore how it turned out. YAY.

Colors I used are:
Skin - E05, E11, E21, E00, E000, R20
Hair - 110, C9, C7, B24
Wings, Shoes, Bow - BV08, BV17, BV13, BV11, BV00
Dress - B99, 29, 26, 24, 21
Bag - E49, 39, 37, 35, 31

Ok. That is it for today. Hope to see you again back here soon. 

Alaine

Friday, January 23, 2015

River of Dreams!

Hi guys! It has been a long time, It has taken me a while to get back into my crafty place (and shhhhh not sure I am all the way there yet) after the holidays and traveling.

I am here to share a couple of images of a foray into mixed media art journaling. Ok... I think I have said this before - I am a little bit of a symmetrical clean lines, precise, color in the lines kind of person. So mixed media is a bit of a stretch for me. And journaling... well... anyway... I had just colored up this lovely fella - "Nancy's Seahorse". 


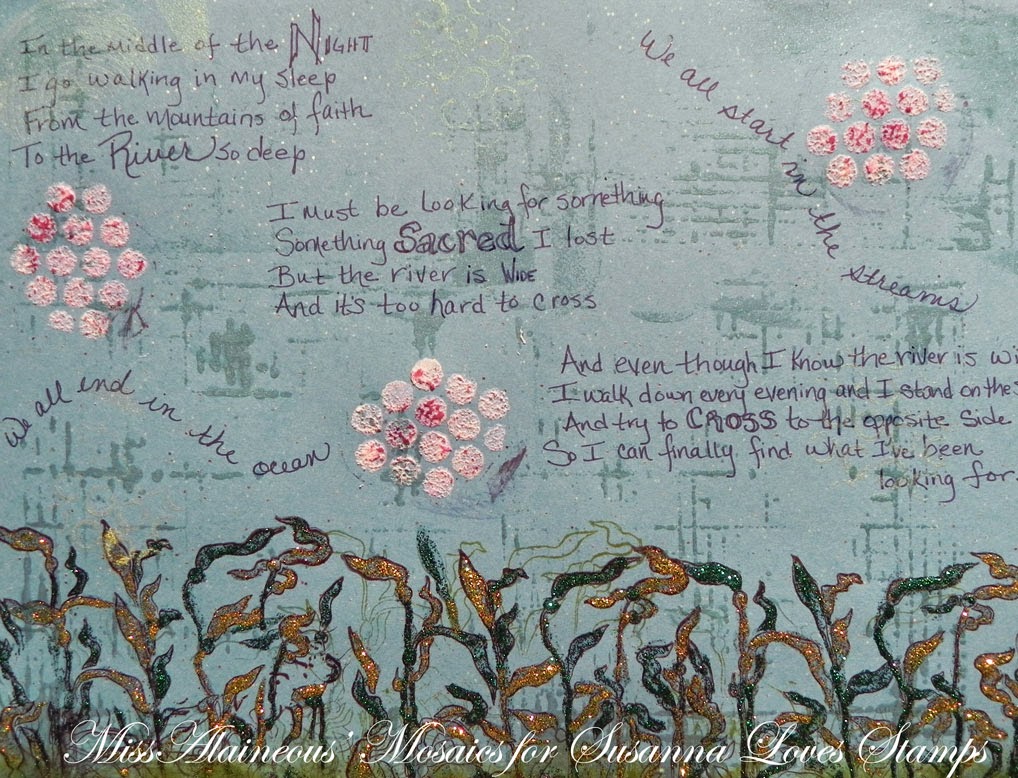
This is one of the times I had colored something up without a specific purpose in mind. Just to have fun coloring! So after a few days Billy Joel's "River of Dreams" came on the radio, and I thought I want to do something  with the lyrics.  So I took some turquoise paper I had that had glitter in it and I cut it to fit in my journal.  I then got to work being non-specific and random-ish... Ok for me...LOL. 


So I took the Sketch Grid Stencil and placed it on different areas of the page and used Silks Caribbean Mist glaze on it. Then I took the Kelp Forest Background Stamp and stamped it multiple times in different colors all on top of each other across the bottom. The last version I stamped was with black ink. Then I took a couple of colors of Stickles (lime and dark green) and a paintbrush and painted the black stamped kelp.


After that I wrote out several of the stanzas from the song, Then I placed Mr. Horse. After that I thought it needed some bubbles, etc... So I took texture paste  and stenciled it through the Well Rounded Stencil. I also added some Vintage Mint Silks Acrylic Glaze through other areas of the pages. The last thing was to add some ink color to the top of the white texture paste after it dried. 

Voila - Art Journaling page. WHEW.

I hope this has provided some inspiration to you - even if it is to inspire you to try something different and out of your comfort zone. 

Hope to see you again soon!!!

Alaine